
In my last post, I introduced the online Write Like Mozart class offered by Coursera. I promised to post some of my notes I sent my high school students from when we collectively took the class last year.
I have logged into the January 2015 offering of the course, and it appears that the videos have not changed since I took the class. The supplemental notes I offer below for Write Like Mozart Class Week 1 are largely unedited from what I sent to my students last year.
General Helpful Hints
- In Week 1, there are over two hours of video, broken into 6-15 minute chunks. Do NOT try to do all of a week’s worth in one day! I recommend allocating about 45 minutes to 1 hour each day to go through a few videos and the exercises involved.
- You can download the videos and the handouts to your computer. Under the LECTURES section (see the LH side of the page), you’ll see something like below. (These icons do not link to the actual course. They are images I grabbed to show you what you would see.)
![]() There are up to 4 icons on the right hand side. The RH one (
There are up to 4 icons on the right hand side. The RH one (![]() ) is to download the video. The LH one (
) is to download the video. The LH one (![]() ) is to download the slides, which also includes the assignments you work on. At least download the SLIDES so you have a record of what was presented in the video, and some of the SLIDES are actual assignment sheets you can fill out with pencil.
) is to download the slides, which also includes the assignments you work on. At least download the SLIDES so you have a record of what was presented in the video, and some of the SLIDES are actual assignment sheets you can fill out with pencil.
If you see the “computer icon” (![]() ), this is an XML file that contains music you can load into NoteFlight, Sibelius, or Finale. Then you can put your answers directly into that program, listen to what you’ve composed, and print out your answer.
), this is an XML file that contains music you can load into NoteFlight, Sibelius, or Finale. Then you can put your answers directly into that program, listen to what you’ve composed, and print out your answer.
- The lecturer talks at a relaxed pace. My son & I watched the downloaded videos with a program called VLC at about 1.4x speed. It still was understandable and a little more efficient in listening! (We slowed it down a little as he got into the more advanced topics.)
Reference Materials:
The course has excellent reference materials on the left hand side of the course page. In the past, someone on the forums created a PDF version of each file. Here is a link to them:
https://drive.google.com/folderview?id=0ByjTPnW1Jy66dnhIa0VhZzhhUTQ&usp=sharing
You can download the files to your computer from here so you have them as a reference.
Important Notes from the Videos:
Lesson 1:
If you’re rusty on scale degrees, what chords are major and minor in a scale, and what notes are in the various 7 chords, keep the PDF of the lecture slides from Lesson handy.
Lesson 2, Part 1:
Keep these slides handy, too. Remember the ranges of each voice (Soprano, Alto, Tenor, Bass), and avoid moving a voice outside of that range when writing for singers.
Chords with 7ths: Note that Mm7 means that the triad is Major, and 7th is minor. MM means Major triad, Major 7th. dm7 means diminished triad, minor 7th. m7 means both triad and 7th are minor.
Closed Voice: Look at the top 3 voices. By his rules, if the Soprano to Tenor is LESS than an octave, it is closed. (Does this rule hold for 7th chords? I don’t know what he’ll say.) For Closed Voice, the SAT voices should spell a chord from one chord tone to the next, without skipping a chord tone. E.g., for a C chord, with an E in Soprano, Alto would be a C (next chord tone down), and Tenor would be a G.
Open Voice: Easiest way to get open voice is to SKIP a chord tone when moving from voice to voice in SAT (although this is not the only way to do it). E.g., with E in the Soprano, the Alto would be a G (skipping the C going down), and the Tenor would be a C (skipping the E going down).
Things to Avoid: Remember that Soprano to Alto, or Alto to Tenor should be octave or less. Tenor to bass should be 12th or less. Don’t put a lower voice higher than an upper voice (e.g., Bass should not be higher than Tenor).
Doubling: In Root Position chords (meaning the NAME of the chord, which is the ROOT of the chord, is the note in the Bass), ALWAYS double the ROOT (the name of the chord) when doing a triad. When doing a chord with a 7th, either double NOTHING, or drop the 5th of the chord and double the ROOT.
Lesson 3:
Harmonic Progression Chart — keep this chart handy! While ultimately your ear is what will tell you if something sounds good or not, this chart should give you a good basic understanding of tonal harmonic motion.
If you have time, pop this chart up on a piano (or Mandolin!), choose a key, and start improvising chord progressions. See if you can get a feel for how the harmonic energy moves in your phrases as you play with it. When I improvise, I almost ALWAYS know what chord I’m playing (I, IV, vi, etc.) and what chords I might play next, using a mental chart similar to this!
Some related observations:
In Jazz, the MOST common chord progression is ii7 -> V7 -> I. You’ve probably heard me say that when you hear a Dominant 7 chord, you immediately know what key you are in. In Jazz, likewise, if you hear a minor 7 chord (like a ii7), you immediately know what key you are in.
In Rock and Roll, it is VERY common for V to return to the IV, as in La Bamba, which does the following progression over and over: ||: I IV V IV :||
It is my hypothesis that by avoiding moving from V to I, rock music is able to avoid a sense of cadence and closing a phrase, thus permitting what I call a “circular chord progression,” a chord progression which goes on and on and on, without stopping.
However, I’ve seen only a few times in Bach where he went from V to a IV (and I was VERY surprised!). You probably wish to avoid that in this class to maintain stylistically true to the goals.
Lesson 4 – Voice Leading
Professor Edwards spoke of Types of Motion: Parallel, Oblique, Contrary, and Static. There is a 5th term you should know: Similar motion:
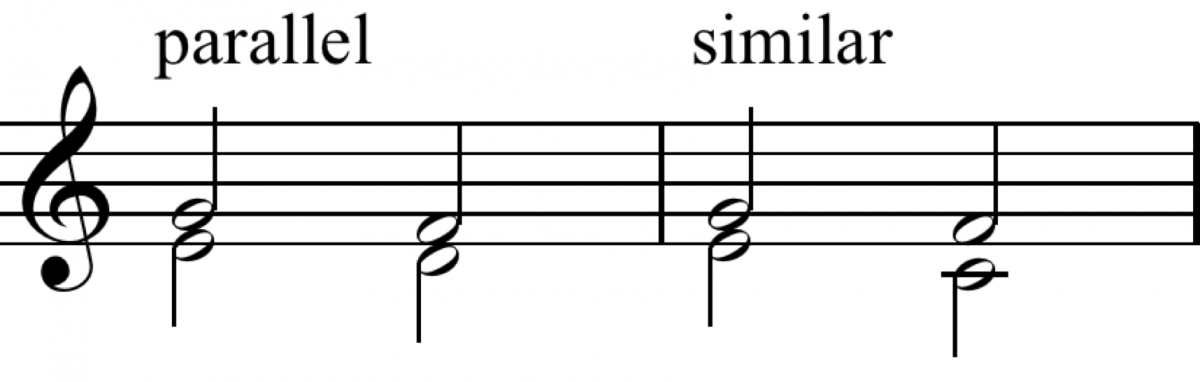
Similar is like Parallel, in that both voices move in the same direction. However, Parallel typically means that both voices move by the same interval, whereas Similar means that the voices move in the same direction, but by different intervals.
Please learn these terms.
Principles of Voice Leading
These are good starting points for writing 4 part harmony. There are extra rules that will be discussed later in the week (e.g., avoiding parallel 5ths, etc.), but try to be aware of these basic rules.
Know that ultimately it is your ear that will tell you if something works or not. It is possible to follow all rules correctly and end up with something drab. Keep trying to find something that works for you!
When the professor speaks of incorporating contrary motion when possible, I believe he is speaking of doing it between any two voices. Clearly, not every voice can move in opposite directions! Simply seek opportunities to make at least one voice go in a direction different from the others.
Here are a couple of things I’ve noticed in my writing that you may find useful:
- Contrary motion between Soprano & Bass is the most defined and clear to hear.
- If you ALWAYS do contrary motion between a pair of voices, it actually starts to sound boring. Mix up contrary with other types of motion.
- Likewise, if a pair of voices always (or almost always) moves in the same direction (parallel or similar motion), then that pair will start to sound almost like one voice, and you will lose the independence of voices generally sought in this style. This problem could most clearly come out if the S & A voices move in the same direction, and the T & B move in same direction. Then the chorale will start to sound like it has only two parts.
Lesson 5 – Part 1:
In both of his examples (I V I) & (I IV I) he went to a chord and returned back to I. This works great for a three chord exercise — we start on the tonic, go away, and then return. However, be careful not to employ this back and return type of writing in longer phrases, as you will start to lose a sense of direction in the harmonic motion. Ultimately, in your phrase, you want to feel like you are starting somewhere (e.g., the tonic), go on a journey through the phrase, and then end at the tonic (or some other destination). It is within that “journey” phase that you want to continue a sense of direction.
Lesson 5, part 5:
Parallel 5ths and parallel 8ves: If you follow the “rules” he offers for this week, it is unlikely you will have parallel 5ths or 8ves. However, try to get in the habit of looking for them, because they WILL start to show up in later lessons. Here’s the trick:
- Look for any octaves (or multiple of such) in a chord.
- If you see a unison, octave, double octave (etc.), then take a note of which voices (e.g., Soprano & Tenor) make up that octave.
- Look at the next chord, and check to see that the same two voices are not also octaves (or multiples of such).
REPEAT that for 5ths — you’re looking for any perfect 5th or 5th plus some multiple of octaves.
EVEN if the voices go in contrary motion, but start and end on octaves or fifths, they are considered a No No.
Lesson 5, part 6:
Chords a 3rd apart: Nothing particularly new here, except notice that chords that are a 3rd apart (e.g., I & iii, or IV & vi), have two common tones. Try to do common tone voice leading when possible.
Common Tone Summary: This table may be useful:
- Chords a 2nd apart have no common tones
- Chords a 3rd apart have 1 common tone
- Chords a 4th (or 5th) apart have 2 common tones.
Lesson 6: Texture
There was a new term for me! I had not heard of (or remembered, perhaps) heterophony. As he mentioned, everything we’re doing this week is considered “homophonic” in the true sense of the word. You’ll also learn that homophony also is used to describe pieces that are melody + accompaniment. Personally, I think that there should be another word used for that style.
Lesson 7: Voice Leading Practice
I hope that you were all successful in navigating this video!
Summary of The Week’s Lessons:
Here is a summary of what was covered this week: WLM Week1Summary
Next week I’ll post my notes from the second week of lessons.